There is nothing quite as transformative as a well-groomed set of eyebrows. You spend hours perfecting your foundation or experimenting with lip colors, yet you often skip over the frame of your face. Many people feel their daily routine falls flat because their brows lack definition or look uneven. It turns out that achieving balanced, natural-looking brows isn't about drawing thick lines; it is about understanding your unique facial geometry.
Whether you have sparse hair density, overgrown arches, or simply want to maintain what you have, the approach needs to be tailored. We often see trends change every year-from ultra-thin penciled looks to full, fluffy sets. But the fundamentals of structure remain constant. Getting this part of your makeup routine right boosts confidence immediately. Here is exactly how to navigate the world of brow artistry without looking overdone.
Understanding Your Brow Anatomy
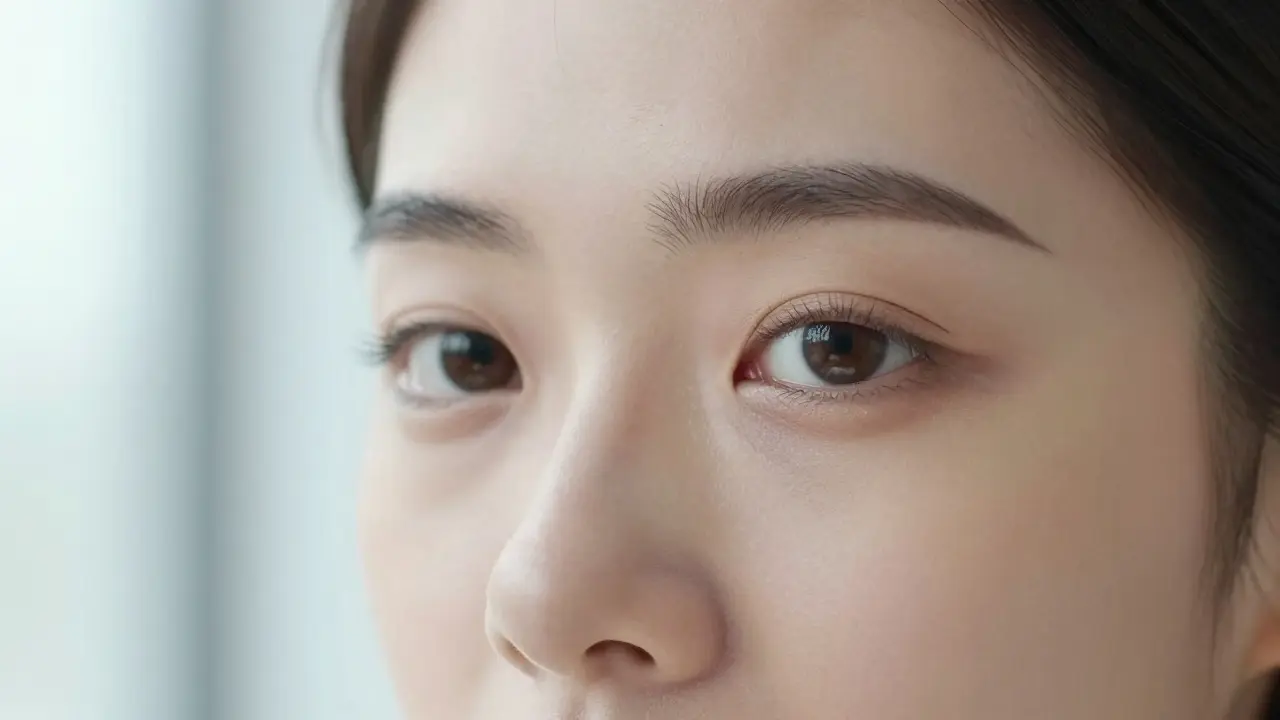
Before touching a brush to your face, you need to understand where your brows actually sit on your skin. Most people assume the "perfect" brow starts directly above the inner corner of the eye. However, human faces vary significantly in bone structure and width. Ignoring this leads to brows that feel disconnected from the rest of your features.
Brow Mapping is a technique used to determine the optimal placement and shape of eyebrows relative to facial features. By mapping these points, you create a framework that ensures symmetry regardless of asymmetry in your natural growth patterns. This method involves three critical landmarks on your face.The first point is the head of the brow. This should align vertically with the side of your nose, not your tear duct. If your eyes are wide-set, starting here prevents your brows from crowding the bridge of your nose. Next comes the peak, or the arch. This highest point sits above the outer edge of your iris when you are looking straight ahead. Placing the peak too low makes your expression look sad, while placing it too high gives a permanently surprised look. Finally, the tail extends toward the temple. It should end when a line drawn diagonally from the side of your nose through the outer corner of your eye crosses the brow bone.
If you pluck below the brow bone, you risk losing permanent follicle health. Always work upwards from the bottom of the brow to find strays. When you map these zones, you have a visual guideline for where to apply product. It keeps your look intentional rather than accidental. For those who use a brow wax kit to manage stray hairs, this mapping ensures you don't remove too much hair from areas you want to preserve for shaping.
Essential Tools for Brow Styling
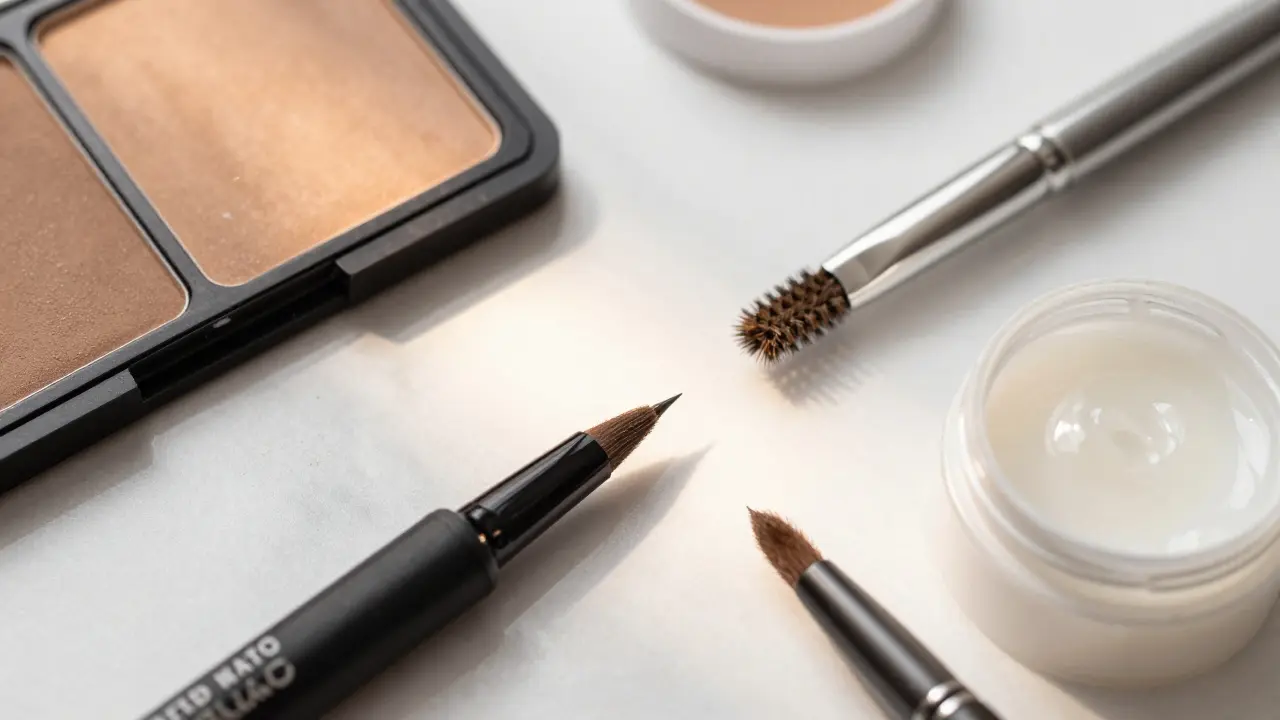
You cannot paint a masterpiece with blunt instruments, and your brows are no different. The market is flooded with options, but you really only need a few core tools to achieve a professional finish at home. Choosing the wrong tool can result in harsh, blocky lines that draw attention away from your eyes.
| Tool Type | Best For | Key Benefit | Durability |
|---|---|---|---|
| Brow Pencil | Hair-like strokes | Precise control | Medium |
| Brow Powder | Filling gaps | Softer, diffused look | High |
| Clear/Gel Pomade | Setting hairs | Long-lasting hold | Very High |
| Spoolie Brush | Blending | Prevents clumping | Moderate |
When selecting a pencil, look for a mechanical design that sharpens itself. Traditional wooden pencils require sharpening, which wastes product and creates a blunt tip after a few uses. For powder, a dual-ended palette with an angled brush allows you to switch between packing color into bare patches and feathering it out for softness. A spoolie brush is non-negotiable. It acts as the glue, blending any harsh lines created by the pigment. Without it, your makeup will sit on top of the skin rather than appearing to grow out of it.
You should also consider the longevity factor. If you live in Boulder where the altitude can dry out product quickly, a water-based formula might flake. Cream-based pomades adhere better to oily skin types, while waxes stick better to dry skin. Matching the product texture to your skin type ensures the brow makeup doesn't migrate throughout the day.
Selecting the Perfect Shade
Picking a color is where most beginners make mistakes. There is a persistent myth that your eyebrow color must match your hair color exactly. While coordination matters, your natural brow pigment is almost always lighter than the darkest hair on your head. Using a shade darker than your roots will cast a shadow over your eyes, making you look tired or older.
Aim for a tone that is one to two shades lighter than your natural hairline. If you are blonde, do not go for an ash grey that looks black. Instead, opt for a taupe or warm beige that mimics the golden undertones of sun-kissed hair. Redheads should avoid orange tones and look for rust or brownish-red hues. For those with graying hair, a cool-toned taupe works best because it bridges the gap between your remaining pigment and the gray without turning purple.
Test the product on the back of your hand first. Watch how the color oxidizes after ten minutes. Some pigments darken as they set due to chemical interaction with air or oils. A swatch test guarantees that you aren't applying a shocking contrast to your forehead. Remember, you want to enhance your features, not replace them entirely.
Step-by-Step Application Process
Now that you have your map and tools, let us walk through the actual application. The goal is to mimic the direction of natural hair growth. Brows grow in distinct swirls across the arch and straight up near the head. Following this pattern creates depth.
- Brush upward: Start by using your clean spoolie to comb all brow hairs up against the skin. This exposes any bald spots or thin areas that need coverage.
- Outline the base: Lightly sketch the bottom edge of your brow following your mapped line. Do not define the top heavily yet. Define the floor, then build the ceiling.
- Draft the strokes: Use short, feathery strokes with your pencil. Mimic individual hairs. Focus primarily on the front third of the brow, as this is where we naturally lose hair density over time.
- Blend outward: Use your spoolie again to blur the pencil lines. This step turns a cartoonish drawing into realistic hair-like texture.
- Set with gel: Apply a tinted or clear brow gel depending on how much color correction you need. This locks the hairs in place so they don't fall forward over your eyelids.
This sequence ensures that the color integrates with your skin tone. You might notice that the skin underneath your hairs is slightly warmer than the pigment you just applied. That is fine. It adds dimension. The most important rule here is light pressure. You can always add more product, but removing excess product without ruining the surrounding makeup is nearly impossible.

Common Mistakes to Avoid
Even after following a guide, small errors creep in. One major issue is connecting the ends too neatly. Many women try to draw a perfectly defined line from nose to temple. Real brows are messy. They fade at the tail. If the tail ends in a hard dot, it draws negative attention.
Another frequent error is ignoring the angle of your face. Round faces benefit from a higher arch to lift the features visually. Square faces benefit from a softer, curved arch to balance the jawline. Long faces often struggle with brows that extend too far back, which elongates the forehead further. Adjusting the start and end points based on your face shape corrects proportions instantly.
Don't forget the area between the brows. Stray hairs here, often called unibrows, can make the face look heavy. Regular trimming or waxing keeps this clean canvas for makeup. Ensure you clean your tweezers with alcohol before use to prevent infection. Hygiene in grooming is as critical as the aesthetic result.
Maintenance and Long-Term Care
Makeup is temporary, but brow health is permanent. Applying product to broken or inflamed skin can cause clogged pores or breakouts along the hairline. Keep the skin exfoliated. Use a gentle cleanser to remove oil buildup, especially if you wear heavy sunscreen or moisturizers.
Consider incorporating a brow serum into your nightly routine. Ingredients like biotin and peptides encourage thicker growth over time. As we age, our estrogen levels drop, leading to thinner hair. Supplementing with nourishing oils helps combat this natural thinning process. Over-plucking years ago? Be patient. Hair grows in cycles. It takes months for a follicle to wake up and produce a visible strand.
For those who wax their brows regularly, avoid applying heavy makeup immediately after treatment. The skin barrier is compromised during the first few hours post-wax. Wait until the evening to apply powders or fillers. This reduces redness and irritation risks.
How do I know which brow shape suits my face?
Identify your face shape first. Oval faces can handle almost any arch height. Round faces suit high arches for lift. Square faces need curved arches to soften angles. Heart-shaped faces work best with rounded, medium arches to balance the narrow chin.
Can I use mascara on my eyebrows?
Technically yes, but it is not recommended. Mascara formulas are designed for eyelashes and contain conditioning agents that can make brow hairs greasy and prone to clumping. Dedicated brow gels have stronger hold polymers suited for stiffer facial hair.
What should I do if my brows are uneven?
Work with the higher brow as your guide. Fill in the lower or shorter brow to match the height and arch of the higher one. Do not try to lower the healthy brow by shaving it down; always build up the lesser brow.
How often should I reshape my eyebrows?
Maintenance plucking should happen every 2-3 weeks. Major shaping depends on your growth rate. If you grow fast, visit a professional or re-shape monthly. Slow growers can go longer between sessions.
Is brow tinting better than makeup?
Tinting stains the hair and skin beneath for a few days. It saves morning time and provides a consistent background color. However, makeup offers daily versatility and removal options if you prefer changing your intensity.


Steven Hanton
April 1, 2026 AT 17:58I find the section on facial geometry particularly insightful because many tutorials ignore bone structure entirely. Understanding where your arch sits relative to the iris changes the whole game for definition. Most people draw lines that disconnect from the eye socket and that creates a disjointed appearance quickly. We often overlook how the bridge of the nose dictates the starting point for natural framing. Mapping these points ensures the makeup enhances rather than fights your actual anatomy. It is a fundamental principle that often gets skipped in favor of quick tricks online.
The distinction between sparse density and overgrowth also deserves serious attention in daily routines. Product selection matters significantly when trying to maintain volume without looking drawn on. Using the wrong texture can lead to product migration throughout the day. Hygiene during the grooming process remains essential for skin health along the hairline. I appreciate that this guide emphasizes prevention over correction in its approach to maintenance.
Kristina Kalolo
April 3, 2026 AT 02:15The mapping technique described actually works very well for fixing asymmetry issues.
Pamela Tanner
April 4, 2026 AT 20:52Selecting the appropriate mechanical pencil prevents unnecessary waste compared to traditional wooden versions. The sharpness consistency allows for precise strokes that mimic individual hairs effectively. Powder palettes offer a softer diffused look which suits those seeking a more blended finish naturally. Every tool serves a specific function in achieving professional results at home comfortably. Maintaining these instruments ensures longevity and prevents bacterial buildup over time.
Albert Navat
April 5, 2026 AT 06:38You have to understand the polymer science behind the hold gels or they fail completely. Water-based formulas degrade faster in low humidity environments like high altitude cities. Cream-based pomades adhere better to sebum production rates on oily skin types specifically. Waxes provide superior grip for coarse facial hair textures common in certain demographics. The viscosity of the gel determines the setting time required before touch-ups occur.
Most consumers ignore the rheology of the product until it flakes off by lunchtime. You need to match the formulation to your local climate conditions precisely. Ignoring environmental factors leads to premature oxidation of the pigment applied. Cross-linking agents in the formula dictate how long the brow stays intact.
ravi kumar
April 5, 2026 AT 14:02Patience is key when dealing with hair regrowth cycles after past damage. Follicles take months to wake up and produce a visible strand naturally. Supplementing with nourishing oils helps combat the natural thinning process associated with aging gracefully. Estrogen levels drop over time and affect hair thickness significantly. Nightly serums support the skin barrier beneath the brow hair. Gentle cleansing removes oil buildup that can clog pores during the growth phase. Consistent care yields better long-term results than aggressive plucking sessions ever could.
King Medoo
April 6, 2026 AT 10:08It is deeply concerning that society pushes artificial modification upon individuals constantly 🙄😤. Many women feel insecure without drawing harsh lines across their own faces daily. We should embrace natural imperfections rather than hiding them under layers of powder immediately 😢. Beauty standards shift every year creating anxiety for anyone trying to keep up with trends. True confidence comes from self-acceptance instead of masking features with cosmetic products 🛑.
The pressure to conform to specific arch shapes causes unnecessary stress and frustration for so many people 🫠. Companies profit off insecurities by selling solutions for problems that do not exist fundamentally 💸. We must educate ourselves on healthy habits rather than relying on chemical coatings for validation 🧠. Real strength lies in loving the person you are today without filters or enhancements 🌱.
Maintaining personal ethics about body image is crucial in a world obsessed with perfectionism 🚫. Prioritize mental well-being over aesthetic approval when making choices about grooming routines 🧘♀️. Remember that your features are unique gifts that deserve respect from within 💖. We deserve to feel comfortable in our own skin regardless of how the brows frame our eyes eventually 🏆.
Rae Blackburn
April 6, 2026 AT 13:54i think these chemicals are dangerous and the companies know it but wont tell u
just trust your gut when you see things
E Jones
April 7, 2026 AT 15:17There is a clear pattern emerging when you examine the ingredient lists in major beauty brands carefully. They introduce synthetic polymers that interact poorly with our endocrine systems over prolonged periods. Regulatory bodies often lag behind the scientific research regarding transdermal absorption risks in cosmetics. Many consumers remain unaware that these daily applications accumulate toxins within the bloodstream gradually. Corporate interests prioritize sales figures over consumer health safety margins consistently. Independent studies suggest that preservatives in gels may cause hormonal disruption with chronic exposure.
We need to demand transparency from manufacturers about what is actually penetrating the skin barrier. The push for flawless aesthetics hides the potential biological costs of these practices. People are sacrificing long-term vitality for a temporary look that fades anyway. Historical precedents show that unregulated additives cause widespread health issues before bans occur. Silence from officials suggests a deeper agenda protecting the profits of conglomerates involved. It is essential to scrutinize every tube before applying anything near sensitive areas like eyes. Wake up to the reality of what you consume through your skin daily.
LeVar Trotter
April 9, 2026 AT 05:55The regulatory framework ensures rigorous testing before any product reaches the retail market shelf. Dermatological assessments validate the safety profile of ingredients used in brow formulations extensively. Toxicity studies confirm minimal risk when used according to label instructions strictly. Consumer protection agencies monitor adverse event reports to flag harmful substances proactively. Transparency is built into modern supply chains through third-party auditing processes regularly.
Scientific consensus supports the safety of approved cosmetic chemicals for topical application safely. We should rely on evidence-based guidelines rather than unfounded speculation about toxicity levels. Professional advice from licensed estheticians helps mitigate perceived risks during styling. Education empowers users to make informed decisions about the products they choose. Trust the established safety protocols developed by experts over decades of research.
Tyler Durden
April 9, 2026 AT 13:52Mastering this routine boosts your entire outlook instantly! Confidence radiates when you feel polished and put together properly. You have the power to shape your presentation however you desire daily. Take control of the details that define your morning ritual completely. Small adjustments yield massive returns in how others perceive you outwardly.
Stay motivated and keep practicing those hair-like strokes regularly. Your dedication to self-care pays dividends in every interaction. Never settle for a look that does not reflect your inner potential fully. Push forward with every session knowing you improve with time. Own your face and let your true personality shine through perfectly.
Aafreen Khan
April 10, 2026 AT 18:05im always lost wth colors i think taupe is best frnd dont go dark bruh looks weird if u r blonde
test it on hand first tho cos it oxidizes fast af
Pamela Watson
April 12, 2026 AT 17:08You should stick to shades lighter than your roots. Darker colors cast shadows and age the face unnecessarily. Taupe works well for most light hair types naturally. Keep it simple and avoid ash grey tones completely. Match undertones to avoid purple hues appearing on the skin.
michael T
April 12, 2026 AT 22:33My emotional state shifted the moment I finally balanced my brows correctly. It felt like unlocking a hidden version of myself that had been waiting beneath surface flaws. The clarity in expression allowed me to project warmth more effectively during conversations. I noticed smiles returned more readily when my features were symmetrical. Vulnerability decreased because the mirror reflection matched my internal feeling of wholeness now. That moment of realization was pure euphoria for a soul tired of fighting shadows.
Christina Kooiman
April 14, 2026 AT 05:56The precision required for proper application demands absolute adherence to grammatical rules in description. Ambiguity in instructions leads to misapplication and frustrating results for the unwary consumer. Clarity ensures the user understands the sequence without deviation or confusion. Syntax matters immensely when conveying technical steps involving delicate skin areas. One cannot afford errors when working close to the orbital bone structurally. Precision dictates outcome in this nuanced craft requiring steady hands. Vague terminology fails to convey the necessary pressure needed for blending edges softly.
Barbara & Greg
April 14, 2026 AT 07:11The philosophical implication of framing the face extends beyond mere aesthetic preference significantly. We construct identity through the deliberate architecture of our outer presentation daily. Symmetry represents a universal desire for balance found in nature and art alike historically. By defining the frame, we acknowledge the canvas of the human experience itself. It is an act of stewardship over the vessel that carries our consciousness. Proper grooming becomes a ritual of self-respect and mindfulness in practice. We sculpt our essence into visibility through these careful gestures intentionally.