
You’ve got that perfect set of hair extensions is synthetic or human hair strands added to natural hair for length and volume. sitting in the box. The mirror shows a bit of thinning at the crown. Your instinct screams: “Just stick them right on top!” It feels like the most logical fix for flat hair. But before you grab your tape tabs or clip-ins, pause. Placing extensions directly on the very top of your head-the crown-is one of the most debated topics in salon chairs everywhere.
The short answer? Yes, you can place extensions near the top, but not exactly where you think. Putting weight directly on the fragile crown area can lead to traction alopecia, visible bumps, and premature shedding. However, strategic placement around the upper perimeter can create the illusion of fullness without the risk. Let’s break down why the crown is tricky, which methods actually work for top-of-head volume, and how to style it so nobody knows you’re wearing them.
Why the Crown Is a Danger Zone
Your scalp isn’t uniform. The hair follicles at the nape of your neck are tough; they handle daily friction from pillows and hats with ease. The crown, however, is different. This area has thinner skin and more sensitive follicles. When you add external weight here, you aren’t just adding length; you’re adding tension.
Traction alopecia is the real enemy here. It happens when constant pulling damages the hair root. If you glue, tape, or weave extensions directly onto the crown, the movement of your head throughout the day creates a leverage effect. Every time you shake your head or tie your hair up, that anchor point gets yanked. Over weeks, this leads to thinning patches that might never fully recover.
Then there’s the visibility issue. The crown is the highest point of your head. Light hits it first. If you have bulky bonds, tapes, or wefts sitting right there, they cast shadows. They look like lumps under your hair. No amount of layering will hide a thick bond sitting dead-center on your skull. For seamless blending, extensions need to sit lower, closer to the mid-shaft of your natural hair, allowing your own strands to fall over the attachment points.
Best Methods for Top-of-Head Volume
If your goal is density at the top, you don’t need to attach to the crown itself. You need to attach *around* it. Here are the safest and most effective methods for achieving that lifted, voluminous look.
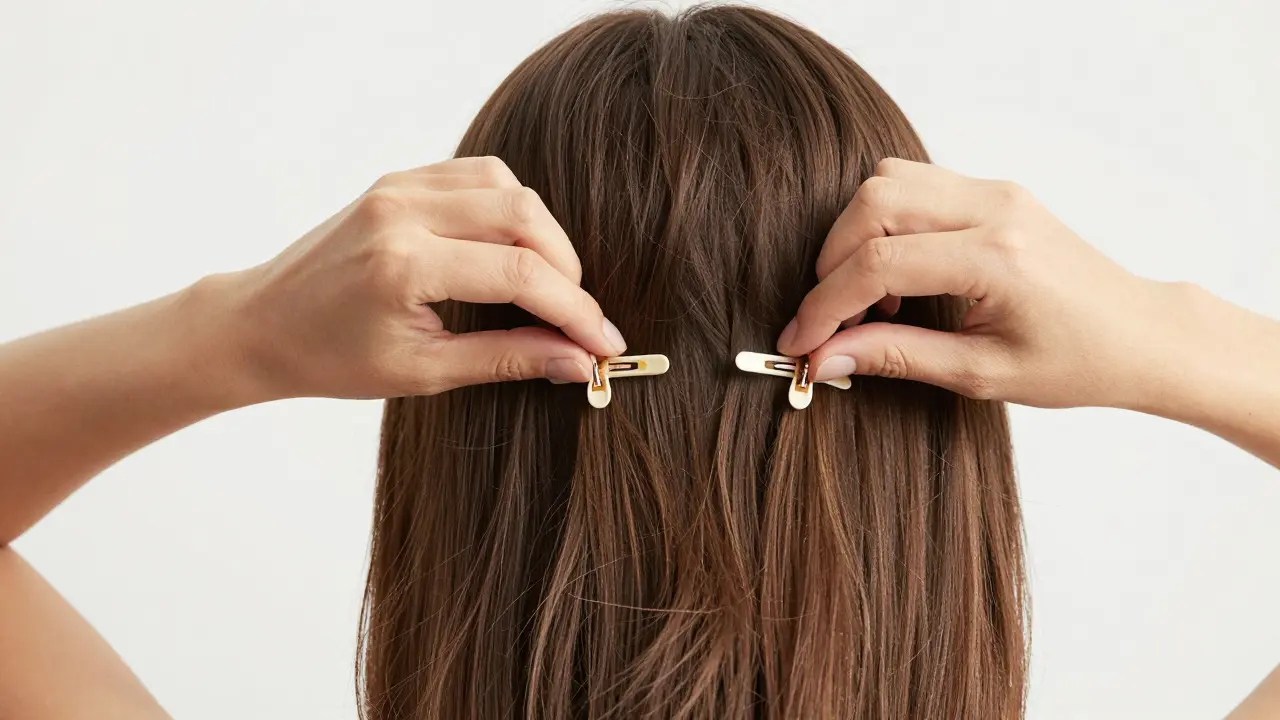
Clip-In Extensions
For immediate top volume without permanent damage, clip-ins are king. The trick isn’t to put the clips on the crown. Instead, place the largest wefts horizontally across the back of your head, just below the occipital bone (the bony bump at the base of your skull). Then, use smaller, single-clip pieces higher up on the sides, framing your face.
To boost the top specifically, take a small section of your natural hair at the crown, tease it gently at the roots, and place a mini clip-in *underneath* that teased section. The natural hair covers the clip, and the teasing adds lift. This gives you height without any adhesive touching your delicate scalp.
Halo Extensions
Halo extensions is a type of extension consisting of a weft attached to a transparent nylon wire. These are fantastic for crown coverage because they require no bonding. The wire sits snugly against your head, hidden by your natural hair. Because the weight is distributed evenly around the entire circumference of your head rather than concentrated in small spots, the stress on any single follicle is minimal.
When styling halos for top volume, focus on curling the ends inward. This draws the eye upward and makes the hair appear thicker at the roots. Just ensure the wire is positioned slightly behind the hairline, not right on the forehead, to keep it invisible.
Tape-Ins and Micro-Links: Strategic Placement
If you prefer semi-permanent options like tape-in extensions is extensions attached using double-sided medical-grade adhesive tabs. or micro-links, you must follow a strict mapping rule. Never place a tab or bead within two inches of the hairline or the crown center.
Instead, start your installation about an inch behind the hairline and continue down the sides. To create the illusion of top volume, your stylist should cut the extensions in layers. By blending shorter pieces into the longer ones around the upper perimeter, light reflects off multiple angles, creating depth. The key is keeping the actual attachment points low enough that your natural hair falls over them completely.
| Method | Safety for Crown | Visibility Risk | Best For |
|---|---|---|---|
| Clip-Ins | High (No Adhesive) | Low (If Teased) | Occasional Wearers |
| Halo | Very High | Medium (Fine Hair) | Fine/Thin Hair |
| Tape-Ins | Medium (Requires Skill) | Low (If Blended Well) | Daily Wear |
| Weave/Braids | Low (High Tension) | High (Bulkiness) | Avoid for Top Volume |

Styling Tricks to Hide the Roots
Even with perfect placement, bad styling can ruin the illusion. If you want extensions to look like they’re growing out of your scalp, you need to master the art of root lifting.
First, always dry your hair upside down after washing. This lifts the roots naturally. Second, use a volumizing mousse at the roots before blow-drying. Avoid heavy oils or serums near the scalp; they weigh hair down instantly.
When brushing, use a soft-bristle brush designed for extensions. Start from the ends and work your way up to prevent tugging on the bonds. For the crown area specifically, try the "root smudge" technique. Take a tiny amount of dry shampoo or texturizing spray, apply it to your fingertips, and gently massage it into the roots of your natural hair. This adds grit and texture, helping your natural strands grip the extensions better and stand up taller.
Another pro tip: avoid straightening the roots. Keep a slight bend or wave near the scalp. Flat, pin-straight hair clings to the head, exposing every bump and bond. Waves and curls distract the eye and add visual width.
Maintenance and Removal
Extensions on the upper head require more frequent maintenance than those at the nape. Why? Because you touch your hair more often. You run your hands through it, you tie it up, you adjust it. This friction loosens adhesives and tangles fibers faster.
Check your bonds every six to eight weeks. If you feel any tightness or see redness on your scalp, remove them immediately. Do not wait for the scheduled appointment. Traction alopecia is painful and preventable.
When removing tape-ins or micro-links, never pull them off yourself. Use the correct solvent or removal tool. Pulling can rip out your natural hair along with the extension. After removal, give your scalp a break. Use a gentle, sulfate-free shampoo and consider a scalp treatment with rosemary oil or caffeine to stimulate blood flow and encourage healthy regrowth.
Common Mistakes to Avoid
- Overloading the Crown: Adding too many wefts in a small area creates bulk. Less is more. Two well-placed wefts are better than four cramped ones.
- Ignoring Hair Texture: If you have fine, slippery hair, tape-ins might slide down. Micro-beads or nano-rings provide a tighter grip for finer textures.
- Sleeping with Wet Hair: Always tie your hair in a loose braid or ponytail before bed. Friction against your pillowball mats extensions and pulls on the roots.
- Using Heat Without Protection: Even human hair extensions lack the natural oils from your scalp. Always use heat protectant spray before curling or straightening.
Final Thoughts on Placement
Placing extensions on the top of your head is less about the physical location and more about the strategy. You aren’t gluing hair to your crown; you’re engineering an optical illusion. By anchoring extensions securely around the perimeter and using styling techniques to lift the roots, you achieve the fullness you crave without sacrificing your natural hair health.
Remember, your natural hair is the foundation. If the foundation cracks, the whole structure fails. Prioritize gentle methods, regular maintenance, and skilled installation. Your future self-and your hairline-will thank you.
Will putting extensions on my crown cause bald spots?
Yes, if placed incorrectly. Direct attachment to the crown with heavy bonds or tight braiding can cause traction alopecia, leading to permanent hair loss. Always keep attachments away from the center of the crown and consult a professional stylist.
What is the best type of extension for thin hair on top?
Halo extensions or lightweight clip-ins are best for thin hair. They distribute weight evenly and do not require adhesives that can slip or damage fine strands. Tape-ins can work if installed by an expert who uses fewer, smaller tabs.
How long do tape-in extensions last on the upper head?
Typically 6 to 8 weeks. However, due to increased movement and friction at the top of the head, they may loosen sooner. Regular check-ups are essential to maintain security and hygiene.
Can I wash my hair with extensions on the crown?
Yes, but be careful. Wash gently in a downward motion. Avoid rubbing the scalp vigorously, especially near the bonds. Use sulfate-free shampoo and conditioner only on the mid-lengths and ends to prevent residue buildup at the roots.
Is it safe to sleep with clip-ins in?
It is not recommended. Sleeping with clip-ins can cause tangling, breakage, and discomfort. Remove them before bed, detangle gently, and store them properly to extend their lifespan.


om gman
June 4, 2026 AT 16:37oh look another article telling people how to not ruin their hair with plastic strips... ground breaking stuff right here. i bet the author has never had a bad hair day in their life and probably brushes their teeth with a diamond toothbrush while sipping artisanal dew from a cloud.
Caitlin Donehue
June 5, 2026 AT 02:42i actually found the part about teasing the roots really helpful since i have super fine hair and clip-ins always slip out on me
Jeanne Abrahams
June 5, 2026 AT 10:31in south africa we just wear our natural curls with pride but sure lets talk about how to glue synthetic fibers to your scalp like it is a fashion statement rather than a cry for help. the concept of traction alopecia is real though and many salons ignore it because they want quick money so this post is slightly less annoying than usual beauty advice that promotes damage over health.
Oskar Falkenberg
June 6, 2026 AT 06:46hey guys i know i am a bit late to the party but i thought i would chime in because my sister tried tape ins once and she ended up losing a chunk of her hair which was pretty scary honestly. i think what the article says about placement is spot on because if you put them too high up it just looks weird and bulky especially if you have thin hair like hers. maybe try halo extensions instead? they seem much safer and easier to manage without all the glue mess that ruins your pillowcases every night lol.
Stephanie Frank
June 7, 2026 AT 09:43let's be real here most people reading this are going to ignore the safety warnings and go straight to youtube tutorials by influencers who clearly have no idea what they are talking about because they get paid to lie. the industry relies on insecurity so they sell you the cure after selling you the disease. it is disgusting how much money women waste on temporary fixes for problems caused by the very products they buy.
Bineesh Mathew
June 9, 2026 AT 01:32the human condition is defined by its desire to alter the self beyond recognition yet we remain trapped in the biological reality of follicles and keratin. to attach foreign strands to one's crown is an act of hubris a denial of the natural order that dictates growth and decay. we seek volume as a metaphor for significance but only achieve tension and eventual loss. the crown is sacred do not defile it with adhesive bonds of commerce and vanity.
Marissa Haque
June 10, 2026 AT 22:23OMG!!! I cannot believe I missed this tip about the root smudge technique!! It sounds absolutely genius!! I have been struggling with flat roots for years and nothing ever seemed to work until now!! Thank you so much for sharing this incredible advice!!
Keith Barker
June 12, 2026 AT 14:17extensions are just modern prosthetics for the vain. we accept them as normal now but historically altering appearance was seen as deceitful or unnatural. perhaps we should return to simpler times where hair was left alone regardless of its texture or length.
Lisa Puster
June 13, 2026 AT 18:06american salons charge an arm and a leg for this nonsense while european stylists understand that good hair comes from genetics not glue. stop buying into the marketing hype and save your money for something that actually matters like investing in yourself rather than covering up flaws with cheap synthetic hair that smells like chemicals.