Putting on spring hair extensions isn’t hard-but if you’ve never done it before, it can feel confusing. You’ve got short hair, maybe shoulder-length or shorter, and you want to add length, volume, or color without cutting or growing. That’s where spring hair extensions come in. These are clip-in extensions with a flexible, coiled wire base that hugs your natural hair like a spring. They’re lightweight, easy to apply, and don’t tug or pull like some other types. But if you don’t get them positioned right, they’ll slip, look unnatural, or even fall out by lunchtime.
Why spring hair extensions work for short hair
Most clip-in extensions are made for medium to long hair. They need something to grip onto. But spring extensions? They’re different. The wire is flexible, so it wraps around small sections of hair like a bungee cord. That means even if your hair is only 4 inches long, you can still secure them. Brands like SpringLock is a a patented clip-in extension system with a memory wire base designed specifically for short hair. Also known as SpringClip, it was developed in 2023 and has since been adopted by salons across the U.S. for clients with pixie cuts, bobs, and shags. They don’t rely on weight or length to stay in-they rely on tension. And that’s why they’re perfect for you.
They’re also heat-safe, so you can style them with a flat iron or curling wand. Most come in 12 to 18-inch lengths, and you can blend them with your natural color using a few simple tricks. No glue. No tape. No damage.
What you need before you start
You don’t need a lot, but having the right tools makes all the difference:
- Spring hair extensions (choose 1-2 wefts for subtle volume, 3-4 for dramatic length)
- A fine-tooth comb
- Small hair clips or sectioning clips
- A light-hold hairspray (optional)
- A mirror that lets you see the back of your head
Don’t use strong-hold spray before applying. It makes your hair stiff and harder to grip. Wait until after they’re in place.
Step-by-step: How to put on spring hair extensions
Start with clean, dry hair. Wet hair stretches and shifts, which makes the extensions slip. If you’ve just washed your hair, let it air-dry or blow-dry it on low heat.
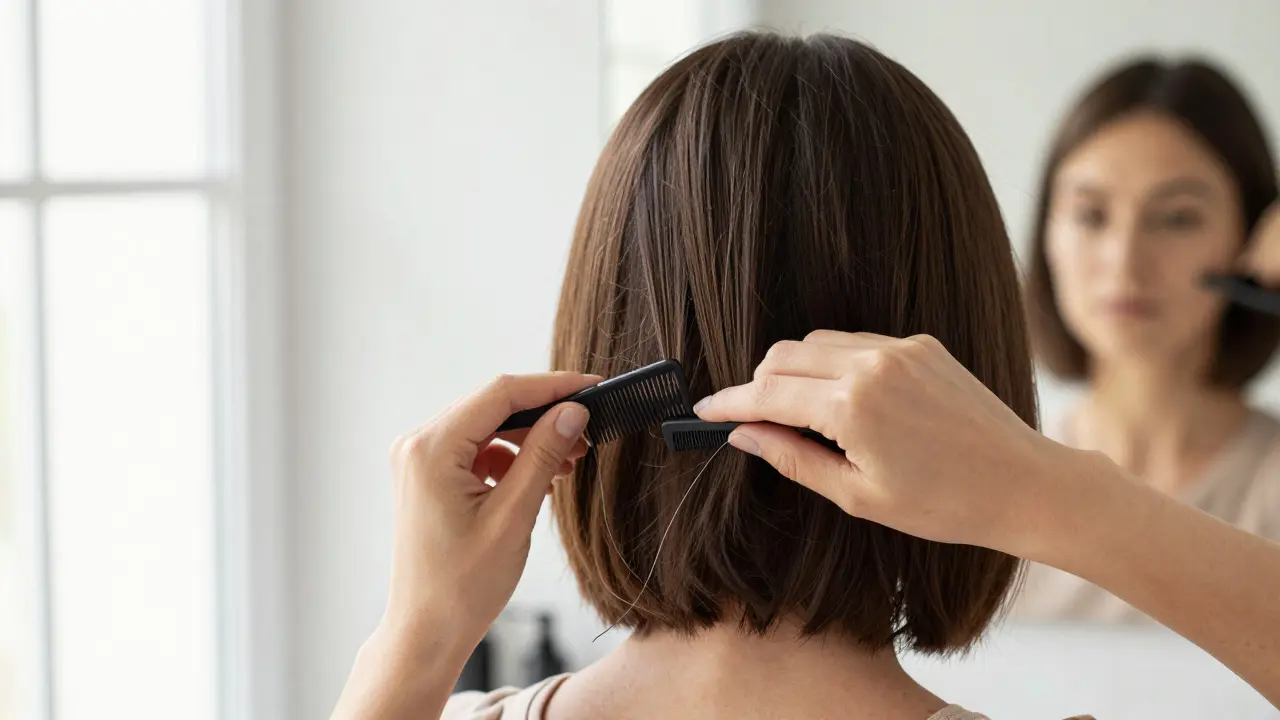
- Section your hair. Use the fine-tooth comb to part your hair into three horizontal layers: nape, mid-head, and crown. Clip the top two layers out of the way. You’ll start with the bottom section.
- Open the spring clip. Hold the extension by the base. Gently pull the two ends of the wire apart-it should open like a horseshoe. Don’t force it. The wire should flex easily.
- Position the clip. Slide the open clip under a small section of hair at the nape of your neck. The wire should sit flat against your scalp, not on top of your hair. You want the base to hug your natural hair, not push it aside.
- Release the spring. Let go of the clip. The wire will snap closed, gripping your hair. Give it a gentle tug. It shouldn’t move. If it does, reposition it.
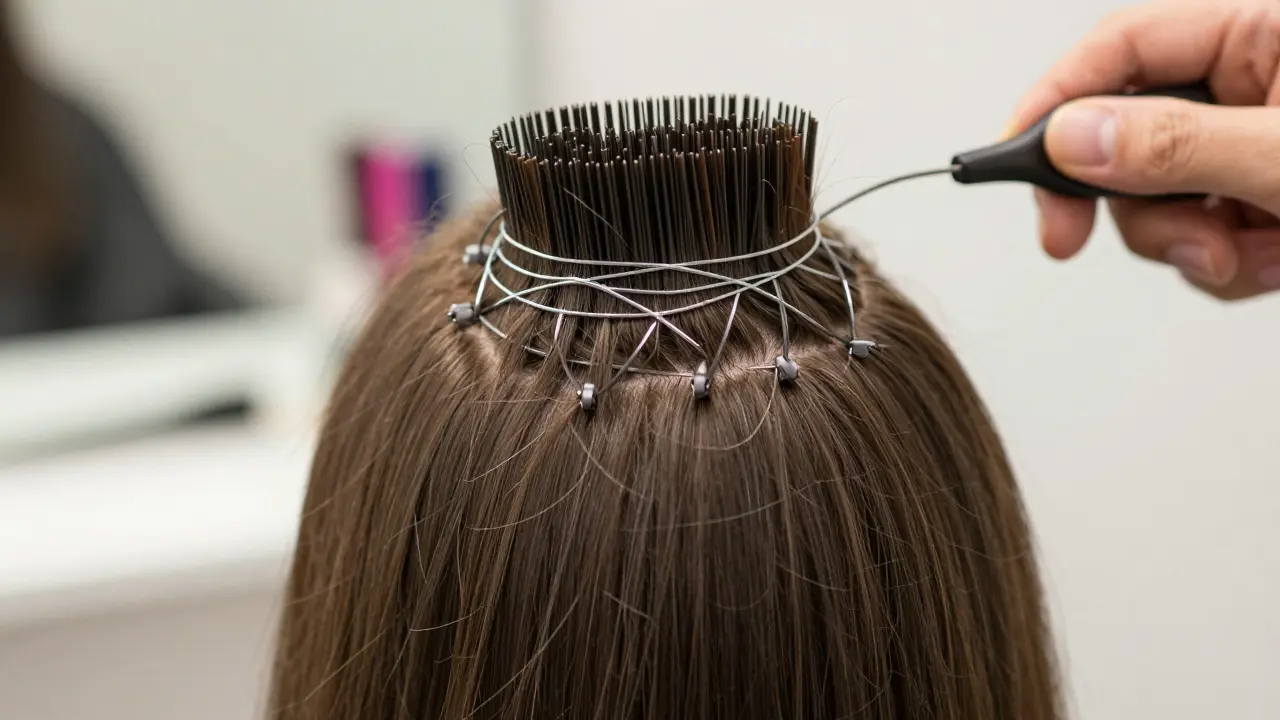
- Repeat for the mid-head section. Unclip the middle layer. Place the second extension just above your ears, slightly forward. This hides the clip line and adds volume where it’s most visible.
- Finish with the crown. The top section gets the last extension. Place it where your natural hair starts to thin, usually just behind your temples. This creates a seamless blend.
- Blend it. Use the comb to gently tease your natural hair over the clips. Don’t pull hard-just lift a little. Then, use your fingers to smooth the extensions into your hair. If you have bangs or layers, comb them over the front clips to hide them.
- Style. Now you can curl, straighten, or braid the extensions like your own hair. Use a heat tool on low to medium. Always use a heat protectant spray.

Common mistakes and how to fix them
Even experienced users mess up sometimes. Here’s what goes wrong-and how to fix it fast:
- The extensions slip out. You didn’t get enough grip. Go back and reapply, making sure the wire is wrapped around at least 0.5 inches of natural hair. If your hair is too fine, try a second layer-clip one extension over another.
- They look bumpy. You placed the clip too high. Slide it down closer to your scalp. The goal is to hide the base under your natural hair, not let it sit on top.
- The color doesn’t match. Hold the extension next to your hair in natural light. If it’s too dark, try a lighter shade. If it’s too red or too ashy, use a toning shampoo on the extensions once a week.
- They feel heavy. You used too many. For short hair, 2-3 wefts are enough. Four or more can weigh down your hair and make your scalp sore.
How long do they last? And how to care for them
Spring extensions last 3-6 months with daily use, if you treat them right. Wash them once every 10 wears with sulfate-free shampoo. Don’t soak them. Just rinse, gently squeeze out water, and air-dry on a towel. Never twist or wring them-that breaks the wire.
Store them flat in a box or on a wig stand. Don’t hang them. The weight of the hair can stretch the spring over time.
And don’t sleep in them. Even though they’re secure, tossing and turning can loosen the clips or tangle the hair.
Who should avoid spring extensions?
They’re not for everyone. If your hair is:
- Extremely thin or fragile (like from chemo or alopecia)
- Very curly or coily (the wire won’t grip well)
- Shorter than 3 inches all over
Then you might want to try a different option-like tape-ins or micro-beads. But if you’ve got at least 4 inches of hair, even if it’s choppy or layered, spring extensions are your best bet.
Real-life tip: What works in Boulder
Here in Boulder, a lot of people use spring extensions for hiking, skiing, or outdoor festivals. They want to look polished without spending hours at the salon. The trick? Use one weft for length and one for volume. That way, you don’t overload your hair. And always wear a hat when you’re outside-UV rays fade the color faster than you think.
Pro tip: If you’re going to a wedding or event, apply the extensions the night before. Let them settle. Then, style them in the morning. It looks more natural that way.
Can I wear spring hair extensions every day?
Yes, you can wear them daily, but not for 12+ hours straight. Take them out before bed, and give your scalp a break every other day. Overuse can cause tension headaches or hair breakage at the clip site. Think of them like earrings-you wouldn’t wear them 24/7 for months on end.
Do spring extensions damage natural hair?
No, if used correctly. Unlike glue or tape, they don’t pull or peel. The spring design distributes pressure evenly. But if you clip them too tightly or leave them in for days, you can cause traction. Always check your scalp after removing them. If you see red marks or hair pulling, you’re using them wrong.
Can I color my spring hair extensions?
Only if they’re made from human hair. Most spring extensions are, but always check the label. You can deposit color (like semi-permanent toners) to adjust the tone, but don’t bleach them. Bleach breaks the cuticle and weakens the wire connection. Stick to color-depositing shampoos or salon toners.
How do I choose the right shade?
Hold the extension next to your hair in daylight. Look for the color that blends at the mid-length, not the roots. Your roots are usually darker, so match the extension to where your hair starts to lighten. If you’re unsure, go one shade lighter-it’s easier to darken than to lighten.
Are spring extensions worth the cost?
Yes, if you use them often. A good set costs $60-$120, but lasts 6 months or more. That’s cheaper than monthly salon visits for extensions. Plus, you can style them yourself. If you only need them for special events, a cheaper set ($30-$50) works fine. Just don’t buy the cheapest ones-they often have thin wire that breaks after a few uses.
Next steps
Try your first set tonight. Put them in, then take a selfie in natural light. Look for any gaps or unnatural lines. Adjust one clip at a time. Practice makes perfect. After a few tries, you’ll be able to put them on in under 5 minutes. And soon, you won’t even remember you’re wearing them.


Ronak Khandelwal
February 10, 2026 AT 23:36OMG I JUST TRIED THIS AFTER READING THIS POST AND I’M CRYING 😭✨ Like, I have pixie cuts and thought I’d never rock long hair again-but spring extensions? They’re like magic for your scalp. I put in two wefts and now I look like I just stepped out of a Lizzo music video. Thank you for this life-changing guide 💖
Jeff Napier
February 11, 2026 AT 04:23Sibusiso Ernest Masilela
February 11, 2026 AT 10:42Oh please. You’re telling people to use 'spring extensions' like they’re some revolutionary breakthrough? My cousin in Johannesburg has been using tension-based clips since 2017. This isn’t innovation-it’s rebranding. And 'SpringLock'? Sounds like a gym supplement. You people are so easily impressed. I’m embarrassed for you.
Daniel Kennedy
February 11, 2026 AT 16:21Just want to add: if you’re new to this, start with one weft. Don’t go full glam on day one. I tried 4 wefts my first time and looked like a confused peacock. One weft at the crown? Game changer. Also-use a silk scrunchie to tie your hair at night if you forget to take them out. Your scalp will thank you.
Taylor Hayes
February 12, 2026 AT 14:51Hey, I just wanted to say how much this helped me. I’ve been avoiding extensions because I thought they’d ruin my hair-but this method actually feels gentle. I’m 42 and just started experimenting with color. I got a honey-blonde set and now I feel like me again. Not 'old me'-just 'me, but sparkly'. Thank you for writing this with so much care.
Sanjay Mittal
February 14, 2026 AT 11:43For those in India with humidity issues: use a light mist of anti-frizz spray on your natural hair BEFORE clipping in. Not on the extensions. Just the roots. It helps the clip grip better. Also, avoid wearing them during monsoon season if you’re outside-moisture makes the wire lose tension. Been there, lost three sets.
Mike Zhong
February 16, 2026 AT 04:33Let’s interrogate the premise. Why do we even need to 'add length' to short hair? Is it because society tells us longer = more valuable? Or because we’ve internalized the idea that hair is a performance? The spring extension isn’t a tool-it’s a symptom. We’re not fixing hair. We’re fixing our fear of being seen as 'too small', 'too quiet', 'too little'.
But also. I tried it. And yeah. It felt good. Contradiction is human.
Jamie Roman
February 17, 2026 AT 01:15I’ve been using these for six months now and I’ve learned so much. First, always let your hair air-dry completely before applying-any dampness = slippage. Second, the 'mid-head' placement is everything. If you put it too far back, it creates a weird ridge. If you put it too far forward, it looks like a wig band. Third, I use a tiny bit of dry shampoo on the roots before clipping-it gives the wire something to grab onto without making hair stiff. Fourth, I rotate which side I clip first every time. Prevents tension headaches. Fifth, I store mine in a pill organizer with foam inserts. Sixth, I only wear them 8 hours max. Seventh, I wash them with baby shampoo. Eighth, I never sleep in them. Ninth, I use a boar bristle brush to blend them. Tenth, I match the shade to my mid-lengths, not roots. Eleventh, I’ve gotten compliments from strangers twice. Twelfth, I’m not sure if I’m addicted or just finally feeling confident. Thirteenth, I might get a third set. Fourteenth, I’m considering dyeing them ash brown. Fifteenth, I’m writing this at 3 a.m. because I can’t sleep and I’m thinking about hair again.
Salomi Cummingham
February 18, 2026 AT 19:52MY HEART. I’m in London and I wore these to a garden party last weekend. I had a bob and suddenly had this cascading wave of chestnut hair-and I swear, three women came up to me and said, 'Is that real? Did you get a weave?' I just smiled and said, 'Nope. Just a little spring magic.' One of them cried. I think she’d been hiding her thinning hair for years. This isn’t about vanity. It’s about dignity. And if you’re reading this and you’re scared? Do it. You deserve to feel like you’re wearing your own hair-even if it’s borrowed.
Johnathan Rhyne
February 20, 2026 AT 10:48Jawaharlal Thota
February 22, 2026 AT 02:14As someone who’s used these for over a year, I want to add: if your hair is fine and you’re struggling with slippage, try using a thin cotton headband under the clips. Just a regular one. It gives the wire extra grip. Also, don’t buy the $20 sets on Amazon-they snap after two uses. Stick to SpringLock or HairHug. I got mine from a salon in Jaipur and they lasted 8 months. Also, if you’re going to a wedding, apply them the night before like the post says. I did this for my sister’s wedding and my mom asked if I got a Brazilian blowout. That’s the goal.
Lauren Saunders
February 23, 2026 AT 08:26